Pages

Recent Posts

Saturday, August 22, 2015

Back to School Scavenger Hunt

If Meet & Greet or Open House is coming up soon, you may want to add this fun idea to your repertoire! The idea is that you send parents, students, or both on a scavenger hunt around your classroom. By the end of the scavenger hunt, families have completed all necessary paperwork, received necessary information, and signed up for volunteer opportunities within the school. Of course, you can change each station to fit your needs and event. But today, I thought I'd give you an inside look at mine!
Engage students and parents with a classroom scavenger hunt!
We host Meet & Greet the Friday before school starts each year. Students receive their teacher placement and visit the classrooms with their families. As a teacher, there are so many things I need filled out, dropped off, taken home, etc. by the end of this one hour. This year, the morning was glitch free and convenient because parents led the way!
Meet the Teacher sign in station
My Writing Center was the first stop. Parents walked right in my door, signed in, and found their child's folder. The scavenger hunt was stapled inside the folder. 
I also placed each student's "Detective Badge" inside the folder.
They wore it during the Meet and Greet so that I would remember their names. 
Classroom Scavenger Hunt
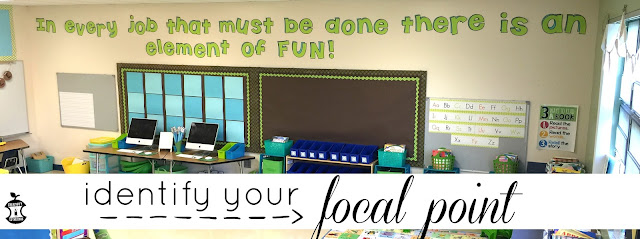
As parents and students left the sign in station, they went over to find Clue #1 which was on our Word Work table. This was our school supply drop station. I labeled a bunch of bins that I had in my classroom and placed extra supply lists on a magnetic hook on the board for those students who haven't purchased supplies yet. This station is essential for me each year! It eliminates tons of bags of supplies on my floor. It also allows students to help and sort with their parents. 
Classroom Scavenger Hunt - Meet the Teacher
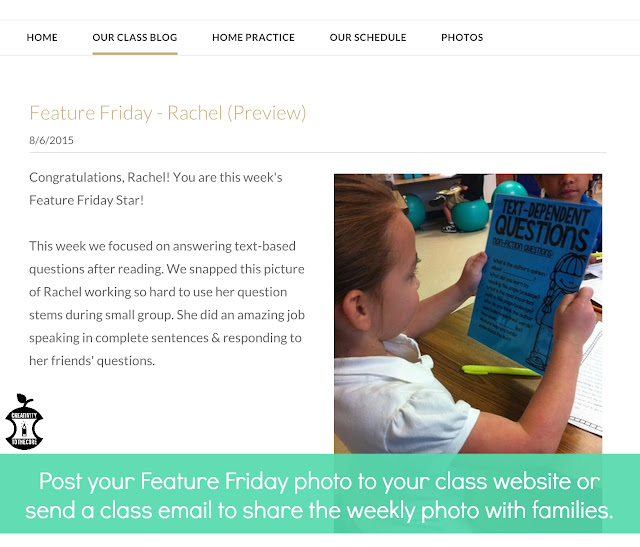
Clue #2 was placed on our computer table (seen in the back of this picture). I had four computers (two classroom computers, a school teacher laptop, and my personal laptop) signed onto the Google Form that you see above. When parents got to this station, they quickly filled out the form and clicked submit. I cannot tell you enough how AMAZING this Google Form idea is. Each time someone fills out the form, it adds their response to an excel spreadsheet that is located in my Google Drive. Brilliant. I now have all phone numbers, allergies, volunteers, transportation information, and...the best part...LEGIBLE email addresses right at my fingertips at school AND at home.
You can find the tutorial for this Google Form here at Sharing Kindergarten.
Classroom Scavenger Hunt
Clue #3 was on this shelf to help students find their classroom book bins. If you look at the image of the sign in station, you will see that each scavenger hunt folder had a number on it. These numbers are the student's classroom number. Parents and students matched the number on the scavenger hunt folder to the number on these blue bins. Many of my kids pulled out the yellow name mat and were excited to see their name ready to go!

Clue #4 was up next! Each student's school paperwork was located at this station in a classified folder. Sorry! I have no pictures of the forms because they are all specific to my school. 
Classroom Scavenger Hunt - Meet the Teacher
Parents then came to my small group table which had Clue #5. Each student received a pack of small markers (left in my room from the previous teacher) and a certificate for completing the scavenger hunt.
Classroom Scavenger Hunt - Meet the Teacher
Finally it was time for the last station. The scavenger hunt said "Find your teacher and snap a picture for our class bulletin board!" My little ones came over to me and we walked right into the hallway to a blank wall to take a photo before they left.

After a few questions and conversations, Meet & Greet was over. Just like that! I am so thankful to have had the scavenger hunt to keep parents and students busy as I chatted with others around the room. 

If you are interested in using this editable scavenger hunt in your classroom, you can check it out here. Because it is editable, you can use it for Meet & Greet, Open House, a classroom scavenger hunt with only your students, or even a hunt around the school! There's even a preview file that shows you some of the pages before you purchase. :)
Classroom Scavenger Hunt - Meet the Teacher

Monday, August 10, 2015

The Book With No Pictures: Books Bloggers Love


Are you looking for a book that will leave your kiddos in hysterics? Well then, this is the book for you! The Book With No Pictures is just that....a book with NO pictures. It was written by B.J. Novak, the writer and executive producer of The Office. You may also know him as the character Ryan Howard on The Office. Just take his humor on the show and put it in a children's book. Friends, it is hilarious! Here is funny a YouTube video read aloud if you'd like to hear it or share it with your class!
There are so many ways to use this book because it lends itself to many topics. Here are a few ideas...

Nonsense Words
Novak uses nonsense words throughout the book to express sounds (onomatopoeia) and just to be silly. The kids just eat it up! I plan on teaching a mini lesson on the difference between real words and nonsense words. I will have students search through the book for words that are nonsense or silly.  This will be the perfect read aloud to show students that they can tell if a word is nonsense by saying it out loud and reading it in the sentence.
Bold Print
There are no pictures in this book, so the author uses many large fonts and bold print to express emotion. You could use this read aloud to teach students about concepts of print and text features. They will learn how to orally read words when they are large, small, bold, and regular print. While you are reading, get really loud and have your students join in when the words are ginormous and stretched across the page. Make your voice soft and squeaky when the words are as tiny.

Picture-less Class Book
Create your own class book of silly words or silly stories. Have each student write one page, and then bind them together. You will be mimicking the layout of The Book With No Pictures. This would be a great way to see if students can use bold print and onomatopoeia in their writing.

Design Your Own Pictures
This would be a fun activity for students who are already fluent readers. Teach a mini lesson on finding details in the text and including them in illustrations. Read the book and have students listen. You may even have them close their eyes as you read. This will allow them to create strong pictures in their minds. After reading, students can draw and label pictures to describe the words on each page of the book. Once they can read the page on their own and create illustrations that match, you will be able to teach the importance of illustrations to the reader.

Enter below to win a copy of a few of this month's books including The Book With No Pictures!


Saturday, August 8, 2015

Orange Ya' Glad it's a Blog Hop!

Glad that you were able to join us for the third annual Orange Ya' Glad it's a Blog Hop! I am the...
If you have hopped with us in the past, some things will be familiar, and some things will be new!
This year, all of our bloggers are focusing on free tips or ideas that they can share with you to get your school year off to a great start.  Some ideas will have a freebie, others might just be a stand alone concept.  The idea is to try and share things that will solve problems and create a happy and stress free first few weeks!

Let's talk about Feature Friday.
This year, I really want my students to take ownership of their writing. I want them to be engaged and to interact with each other throughout the process. My hope is that Feature Friday will make this happen.

What is Feature Friday?
Feature Friday is an interactive way to integrate technology and writing. Students take photos throughout the week on iPads, iPhones, or with cameras (whichever you have access to!) of any classroom happening, activity, or student that interests them. Then, on Friday, you pick one photograph to share on your classroom website. It is important that you choose pictures that students have taken. This keeps Feature Friday genuine and kid-centric. The student or students who are pictured in that chosen photo become the Feature Friday Stars! 
Making Connections and Writing Collaboratively
Feature Friday is not only a fun way to share photos, it is also a great way to get students to write about what they see! My kindergarteners will be able to write about our Feature Friday Star the VERY first week of school because we will write orally first, and then I will type directly onto our classroom website as we repeat the sentence.

Here is an example of a Feature Friday post on our classroom website. If you do not have a classroom website, you could simply send an email to your entire class with a picture and a few sentences to explain it. If you are interested in using a classroom website, check out Weebly.com. It is super easy to use, looks very professional, and it's FREE!

(Disclaimer - The photograph below is old. It is not an actual Feature Friday picture taken by students. The description was not written by students. This is just a sample of what Feature Friday will look like. The student's name has been changed for privacy.) 
Connecting Families
We all know that families are busy and it is often difficult to get them to regularly check the classroom website or read the weekly newsletter. This year, I have decided to ditch the newsletter. I am going to solely rely on Feature Friday. How? Feature Friday bracelets.

Every Friday, when I pick one photo from the week, I will project it on the board. The students and I will congratulate the Feature Friday Star (the child in the photo) and present them with their Feature Friday bracelet before we write the description together. The bracelet will be taped around their wrist so that family members see it. 

Imagine the excitement from my sweet students when their picture has been chosen, they have been congratulated in class, they received a bracelet, AND they get to share it with their families! My hope is that parents and relatives will be just as excited! Teachers, here's the exciting part...The Feature Friday bracelet prompts families to check the website (or email) to see their child as the Feature Friday Star!
I am so excited to integrate collaborative writing in this simple, yet creative way for students. I think it will really help them to understand that all pictures can be written about and shared with others. Sharing the pictures on a website or emailing them to parents, will make children SO proud of themselves. ...And, as an added bonus, it will draw parents toward your classroom website. What more could you ask for?!?

If you'd like to start Feature Friday in your classroom, grab this Feature Friday bracelet freebie!
Please click HERE to download the file.

We will be having an Instagram giveaway again!  At the bottom of each post, there will be a letter. 
 The letters all work together to give you the name of a type of orange!  This year is a bit tricky...it's a two word name!  **Hint: The numbers in the top right corner signify the order!" 
Once you've solved the puzzle...take a picture of the answer.  
Post it on instagram and hashtag it with #orangehop2015.  We love original ideas...so, do something fun with your image! Check out some images from last year's IG hop below!
We will go through the pictures and select a winner!
Next up on the hop is...Sabra from Teaching with a Touch of Twang!


Thursday, August 6, 2015

Exciting News! - Florida Blog Hop!

Happy back to school season!
I'm excited to announce a fun Florida-centric blog hop!
I'm joining with some wonderful Florida bloggers to give you some great back to school ideas that will give you all you need to start the year off right!  You can look forward to seeing tips from the following Florida PreK-5 bloggers!


Tuesday, August 4, 2015

Lollipics - Teachers Are Sweet!

Do you love lollipops? I do! ...and I know for a fact that my kindergarteners do!

I am thrilled to be working with Laura from Laura Kelly Designs & Me & My Inklings to share these tasty {personalized} treats with you! Yes, I said PERSONALIZED. If you're a teacher like me, chances are you love a fancy monogram or freshly labeled bin. So, you can imagine my excitement when I discovered I could personalize a lollipop

Laura has designed some adorable clipart that is just right for your classroom, school, staff, or community. Her easy to use site even allows you to upload any image that you wish! When ordering my lollipops, I had to things in mind. 1 - Meet the Teacher night and 2 - How can I keep these going all year long?

In the image below, you can see my Meet the Teacher lollipop which says "You color my world!" with a cute crayon doodle. These will be a HUGE hit with students and parents. I mean, what kid doesn't love a large rainbow candy?! I will definitely be sharing more of these once I get all set up for that night!

On the right, is my "Today a reader. Tomorrow a leader." lollipop. I chose an image of a book for this one. I love the unique contrast of the green book against the plain white lollipop! These will be perfect for students when they hit a reading milestone during the year!


If you are interested in snagging some of these colorful creations for your classroom this fall, be sure to check them out today! There's a deal waiting for you!

Here's how...
1) Visit LollipicsForTeachers.com
2) Choose the image that fits your fancy (birthday, welcome back, etc.) and add your personalized text
3) Use the promo code TEACHER to get your set for $1 each (minimum order of 30)


Be sure to also enter the giveaway below! 
You can win an Ellison AllStar Machine, cute Dies, and more custom lollipops. Good luck!

*I was compensated for this giveaway with my own set of custom Lollipics for my classroom.

Sunday, August 2, 2015

Bulletin Board Ideas

Hello friends! As back to school time approaches, bulletin boards are a constant topic. Today, I am linking up with Ashley from Schroeder Shenanigans in 2nd and Angie from Lucky Little Learners to share some tips and tricks to make your bulletin boards beautiful (and not too stressful!). Hope you enjoy!
If you haven't noticed already, I am (just a tad) OCD in my classroom. There is a place for everything, everything is in its place, and everything is tied together with COLOR. I have used blue, green, and brown with small pops of yellow for the past two years and absolutely love it! Why do I keep my color scheme the same? 1 - It's expensive to purchase this stuff! Using it from year to year is important to me. 2 - A color scheme can go with almost any theme you wish.

Why blue, green, and brown?
There has been research done that shows the color blue produces a sense of calm. Yellow on the other hand, can be a very strong color for students who struggle with attention disorders or students who have autism. Think about ambulances and stop/yield signs. They are either red or yellow. These colors spike our attention and make us very aware of our surroundings.


When creating a classroom environment, color scheme is KEY! Pick a few colors and go for it. Your bulletin boards are going to be the pops of color that "ground" your classroom and pull everything together for a cohesive look. Layer borders to give your bulletin boards more detail and "curb-appeal" from far across the room. I use brown paper in the back of my room so that I can add more color when the student work is added. In the front of the room, I use the brighter green paper (seen in the first image with the chevron border).

You can see from the images above that I have many different colored bulletin board papers and borders in various arrangements. However, all of the colors are in the same "family".

Here are the links to the specific borders used in my classroom:
Key border: Dollar Tree
Brown and lime chevron borders: Creative Teaching Press
White wavy border: Creative Teaching Press
Lime polka dot border: Teacher Created Resources on Amazon
Lots of Dots brown border: Creative Teaching Press
Brown Bordette: Pacon on Amazon
All bulletin board paper is the Fadeless brand from my local teacher store.


This year, I knew I wanted to put a quote above my boards to fill the blank space. We are not allowed to paint any walls, so this idea added a large pop of color. Our grade level theme is Fantasy, so I chose a Mary Poppins quote that I just ADORE for kindergarten. This is the focal point of our classroom. Your eye is drawn to it the moment you walk in...and you may just start singing "oohhh a spoonful of sugar helps the medicine go down". 

How do I create one for my classroom?
If you are interested in creating a large quote for your classroom, it is VERY simple. Just create a PowerPoint document and insert a text box on each page. Type one letter per page and choose a thick font you love at a large font size. I used KG The Last Time at size 667. Click format and change the font fill to "none" or "transparent" and the outline to "black". Print it on bright paper. I used the green from this pack and teal from a pack parents donated last year. I layered the two for a textured look. When you print, be sure to click on "Fit to page" or "Shrink to fit" so the edges of the font don't get cut off! 
Here's another focal point example from my first grade classroom two years ago.
Kids and staff alike LOVED our tree. Plus, it tracked our AR progress!

Here's a quick tip to leave you with...
Imagine you just created a "fake" bulletin board on the ugly back of some cubbies, but you weren't sure if you want to use white or green lettering. :) Yup...that was me!

I'm not sure why I didn't think of this before, BUT all you have to do is take a picture of the blank board. Then, insert it into a PowerPoint and type right on top of it! (See mine above!) Mess around with the colors and fonts until you get something you love. Then, simply enlarge the letters, print them, cut them out, and tape them up. Ta-da! I wish I had thought of this sooner. I would have done every bulletin board this way!


Be sure to check out the links below to get more brilliant bulletin board ideas for back to school!


Saturday, August 1, 2015

Quality Teacher Shirts

Do you wear enjoy wearing fun teacher t-shirts in the classroom on Fridays? I do! I cannot wait to grab a few new ones this year as I move to kindergarten! If you are on the lookout for adorable teacher shirts, look no further. Aplusimages.com, teachershirts.com, and classroomfaces.com have everything your teacher heart could desire!
Last month, as I was prepping to travel to Las Vegas for the SDE and Teachers Pay Teachers conference, I heard about a company offering bloggers a FREE t-shirt with their logo. Of course I jumped on that opportunity! The online editing tool on aplusimages.com was very simple to use. I picked a t-shirt style and color, and poof! I had a beautiful new teacher shirt!

Within a few days, my t-shirt was on my front steps. Just in time for Vegas! Let me tell you...this shirt is perfect! The color is bright, and my logo is not one bit blurry. A+ Images was so thoughtful to include blogger instructions as well as directions on how to get the best results when you first wash the t-shirt. While in Vegas, I loved seeing all the other bloggers showing off their blog with a shirt. :) It's such a fun idea and helped to easily identify people that I did not know personally. 
A+ Images has many different t-shirt options. You can create your own with their custom shirt category, you can browse their teacher apparel, and you can even get a class t-shirt that includes all of your sweet students' faces! How stinkin' adorable is that?!?! Go to classroomfaces.com to customize the color and faces before you order yours for the new school year. I just know my students and parents will love them!

Pin It button on image hover